FastAPI for Flask Users
While Flask has become the de-facto choice for API development in Machine Learning projects, there is a new framework called FastAPI that has been getting a lot of community traction.

I recently decided to give FastAPI a spin by porting a production Flask project. It was very easy to pick up FastAPI coming from Flask and I was able to get things up and running in just a few hours.
The added benefit of automatic data validation, documentation generation and baked-in best-practices such as pydantic schemas and python typing makes this a strong choice for future projects.
In this post, I will introduce FastAPI by contrasting the implementation of various common use-cases in both Flask and FastAPI.
At the time of this writing, the Flask version is 1.1.2 and the FastAPI version is 0.58.1
Installation
Both Flask and FastAPI are available on PyPI. For conda, you need to use the conda-forge channel to install FastAPI while it’s available in the default channel for Flask.
Flask:
pip install flask
conda install flask
FastAPI:
pip install fastapi uvicorn
conda install fastapi uvicorn -c conda-forge
Running “Hello World”
Flask:
app.py
from flask import Flask

app = Flask(__name__)

@app.route('/')
def home():
    return {'hello': 'world'}

if __name__ == '__main__':
    app.run()
Now you can run the development server using the below command. It runs on port 5000 by default.
python app.pyFastAPI
app.py
import uvicorn
from fastapi import FastAPI

app = FastAPI()

@app.get('/')
def home():
    return {'hello': 'world'}

if __name__ == '__main__':
    uvicorn.run(app)
FastAPI defers serving to a production-ready server called uvicorn. We can run it in development mode with a default port of 8000.
python app.pyProduction server
Flask:
app.py
from flask import Flask

app = Flask(__name__)

@app.route('/')
def home():
    return {'hello': 'world'}

if __name__ == '__main__':
    app.run()
For a production server, gunicorn is a common choice in Flask.
gunicorn app:appFastAPI
app.py
import uvicorn
from fastapi import FastAPI

app = FastAPI()

@app.get('/')
def home():
    return {'hello': 'world'}

if __name__ == '__main__':
    uvicorn.run(app)
FastAPI defers serving to a production-ready server called uvicorn. We can start the server as:
uvicorn app:appYou can also start it in hot-reload mode by running
uvicorn app:app --reloadFurthermore, you can change the port as well.
uvicorn app:app --port 5000The number of workers can be controlled as well.
uvicorn app:app --workers 2You can use gunicorn to manage uvicorn as well using the following command. All regular gunicorn flags such as number of workers(-w) work.
gunicorn -k uvicorn.workers.UvicornWorker app:appHTTP Methods
Flask:
@app.route('/', methods=['POST'])
def example():
    ...
FastAPI:
@app.post('/')
def example():
    ...
You have individual decorator methods for each HTTP method.
@app.get('/')
@app.put('/')
@app.patch('/')
@app.delete('/')
URL Variables
We want to get the user id from the URL e.g. /users/1 and then return the user id to the user.
Flask:
@app.route('/users/<int:user_id>')
def get_user_details(user_id):
    return {'user_id': user_id}
FastAPI:
In FastAPI, we make use of type hints in Python to specify all the data types. For example, here we specify that user_id should be an integer. The variable in the URL path is also specified similar to f-strings.
@app.get('/users/{user_id}')
def get_user_details(user_id: int):
    return {'user_id': user_id}
Query Strings
We want to allow the user to specify a search term by using a query string ?q=abc in the URL.
Flask:
from flask import request

@app.route('/search')
def search():
    query = request.args.get('q')
    return {'query': query}
FastAPI:
@app.get('/search')
def search(q: str):
    return {'query': q}
JSON POST Request
Let’s take a toy example where we want to send a JSON POST request with a text key and get back a lowercased version.
# Request
{"text": "HELLO"}

# Response
{"text": "hello"}
Flask:
from flask import request

@app.route('/lowercase', methods=['POST'])
def lower_case():
    text = request.json.get('text')
    return {'text': text.lower()}
FastAPI:
If you simply replicate the functionality from Flask, you can do it as follows in FastAPI.
from typing import Dict

@app.post('/lowercase')
def lower_case(json_data: Dict):
    text = json_data.get('text')
    return {'text': text.lower()}
But, this is where FastAPI introduces a new concept of creating Pydantic schema that maps to the JSON data being received. We can refactor the above example using pydantic as:
from pydantic import BaseModel

class Sentence(BaseModel):
    text: str

@app.post('/lowercase')
def lower_case(sentence: Sentence):
    return {'text': sentence.text.lower()}
As seen, instead of getting a dictionary, the JSON data is converted into an object of the schema Sentence. As such, we can access the data using data attributes such as sentence.text. This also provides automatic validation of data types. If the user tries to send any data other than a string, they will be given an auto-generated validation error.
Example Invalid Request
{"text": null}Automatic Response
{
    "detail": [
        {
            "loc": [
                "body",
                "text"
            ],
            "msg": "none is not an allowed value",
            "type": "type_error.none.not_allowed"
        }
    ]
}
File Upload
Let’s create an API to return the uploaded file name. The key used when uploading the file will be file.
Flask
Flask allows accessing the uploaded file via the request object.
app.py
from flask import Flask, request
app = Flask(__name__)

@app.route('/upload', methods=['POST'])
def upload_file():
    file = request.files.get('file')
    return {'name': file.filename}
FastAPI:
FastAPI uses function parameter to specify the file key.
app.py
from fastapi import FastAPI, UploadFile, File

app = FastAPI()

@app.post('/upload')
def upload_file(file: UploadFile = File(...)):
    return {'name': file.filename}
Form Submission
We want to access a text form field that’s defined as shown below and echo the value.
<input name='city' type='text'>Flask
Flask allows accessing the form fields via the request object.
app.py
from flask import Flask, request
app = Flask(__name__)

@app.route('/submit', methods=['POST'])
def echo():
    city = request.form.get('city')
    return {'city': city}
FastAPI:
We use function parameter to define the key and data type for the form field.
app.py
from fastapi import FastAPI, Form
app = FastAPI()

@app.post('/submit')
def echo(city: str = Form(...)):
    return {'city': city}
We can also make the form field optional as shown below
from typing import Optional

@app.post('/submit')
def echo(city: Optional[str] = Form(None)):
    return {'city': city}
Similarly, we can set a default value for the form field as shown below.
@app.post('/submit')
def echo(city: Optional[str] = Form('Paris')):
return {'city': city}Modular Views
We want to decompose the views from a single app.py into separate files.
- app.py
- views
  - user.py
Flask:
In Flask, we use a concept called blueprints to manage this. We would first create a blueprint for the user view as:
views/user.py
from flask import Blueprint
user_blueprint = Blueprint('user', __name__)

@user_blueprint.route('/users')
def list_users():
    return {'users': ['a', 'b', 'c']}
Then, this view is registered in the main app.py file.
app.py
from flask import Flask
from views.user import user_blueprint

app = Flask(__name__)
app.register_blueprint(user_blueprint)
FastAPI:
In FastAPI, the equivalent of a blueprint is called a router. First, we create a user router as:
routers/user.py
from fastapi import APIRouter
router = APIRouter()

@router.get('/users')
def list_users():
    return {'users': ['a', 'b', 'c']}
Then, we attach this router to the main app object as:
app.py
from fastapi import FastAPI
from routers import user

app = FastAPI()
app.include_router(user.router)
Data Validation
Flask
Flask doesn’t provide any input data validation feature out-of-the-box. It’s common practice to either write custom validation logic or use libraries such as marshmalllow or pydantic.
FastAPI:
FastAPI wraps pydantic into its framework and allow data validation by simply using a combination of pydantic schema and python type hints.
from fastapi import FastAPI
from pydantic import BaseModel

app = FastAPI()

class User(BaseModel):
    name: str
    age: int

@app.post('/users')
def save_user(user: User):
    return {'name': user.name,
            'age': user.age}
This code will perform automatic validation to ensure name is a string and age is an integer. If any other data type is sent, it auto-generates validation error with a relevant message.
Here are some examples of pydantic schema for common use-cases.
Example 1: Key-value pairs
{
  "name": "Isaac",
  "age": 60
}
from pydantic import BaseModel
class User(BaseModel):
name: str
age: intExample 2: Collection of things
{
  "series": ["GOT", "Dark", "Mr. Robot"]
}
from pydantic import BaseModel
from typing import List
class Metadata(BaseModel):
series: List[str]Example 3: Nested Objects
{
  "users": [
    {
      "name": "xyz",
      "age": 25
    },
    {
      "name": "abc",
      "age": 30
    }
  ],
  "group": "Group A"
}
from pydantic import BaseModel
from typing import List
class User(BaseModel):
name: str
age: int
class UserGroup(BaseModel):
users: List[User]
group: strYou can learn more about Python Type hints from here.
Automatic Documentation
Flask
Flask doesn’t provide any built-in feature for documentation generation. There are extensions such as flask-swagger or flask-restful to fill that gap but the workflow is comparatively complex.
FastAPI:
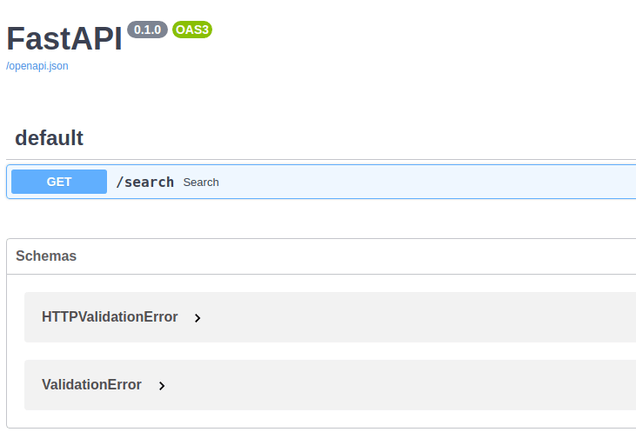
FastAPI automatically generates an interactive swagger documentation endpoint at /docs and a reference documentation at /redoc.
For example, say we had a simple view given below that echoes what the user searched for.
app.py
from fastapi import FastAPI

app = FastAPI()

@app.get('/search')
def search(q: str):
    return {'query': q}
Swagger Documentation
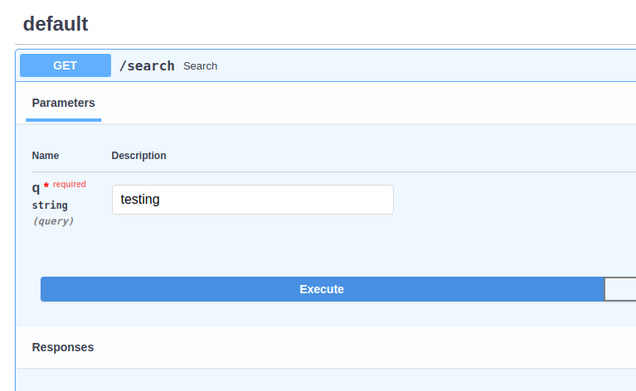
If you run the server and goto the endpoint http://127.0.0.1:8000/docs, you will get an auto-generated swagger documentation.

You can interactively try out the API from the browser itself.

ReDoc Documentation
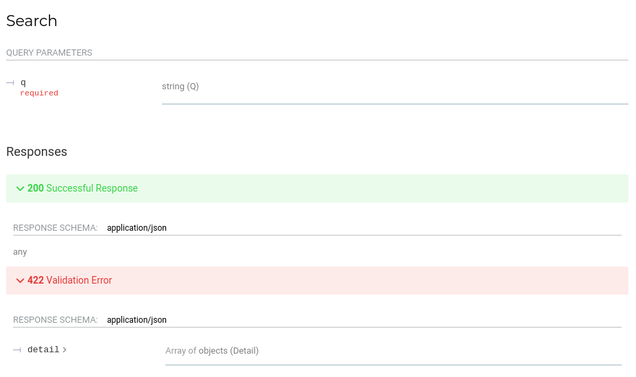
In addition to swagger, if you goto the endpoint http://127.0.0.01:8000/redoc, you will get an auto-generated reference documentation. There is information on parameters, request format, response format and status codes.

Cross-Origin Resource Sharing(CORS)
Flask
Flask doesn’t provide CORS support out of the box. We need to use extension such as flask-cors to configure CORS as shown below.
app.py
from flask import Flask
from flask_cors import CORS

app_ = Flask(__name__)
CORS(app_)
FastAPI:
FastAPI provides a built-in middleware to handle CORS. We show an example of CORS below where we are allowing any origin to access our APIs.
app.py
from fastapi import FastAPI
from fastapi.middleware.cors import CORSMiddleware

app = FastAPI()

app.add_middleware(
    CORSMiddleware,
    allow_origins=['*'],
    allow_credentials=True,
    allow_methods=["*"],
    allow_headers=["*"],
)
Conclusion
Thus, FastAPI is an excellent alternative to Flask for building robust APIs with best-practices baked in. You can refer to the documentation to learn more.